Growing Gardenias (a.k.a. Cape Jasmine or Cape Jessamine)
Note: all images in this growing guide are clickable if you need a larger version or would like to learn more about the plants pictured here
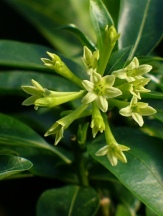
Aimee Yoshioka Gardenia
For fragrance in the garden few plants can compare with the unforgettable perfume that Gardenias can provide. Gardenias may begin flowering as early as mid to late spring often peaking in summer with established plants and various cultivars producing some flowers into early fall. These beautiful evergreen shrubs were known lovingly to many of our ancestors by names like Cape Jasmine or Cape Jessamine and many of the Gardenias still grown today are these same heirlooms that have been shared via cuttings and transplants across much of the South. Today we have many more varieties to choose from and these cold tender evergreen shrubs can even be enjoyed well into zone 6 and 7 with selections such as ‘Kleim’s Hardy’, ‘Grif’s Select’ and the Louisiana Super Plant selection ‘Frostproof’. From diminutive low spreading dwarfs like ‘Fragrant Path’, to the compact single flowered forms like ‘Cutie Pie’, to the giant ‘Aimee Yoshioka’, and even variegated forms, so today there is a Gardenia suited to fit almost any garden setting. Did we mention that they also make easy container plants that can be overwintered indoors where not cold hardy. Along with ‘Vietchii’, some types are considered everblooming under warm tropical conditions such as the ‘Shining Gardenia’ or Gardenia nitida, ‘Vietnamensis’, and the Golden Gardenia, Gardenia tubifera var. kula.
.JPG)
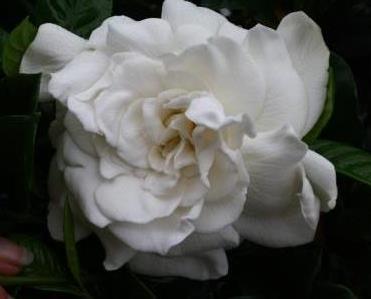
Martha Turnbull Gardenia
Gardenias prefer an acidic, moist, but well-draining, rich, friable loamy soil preferably topped by an organic mulch as well as moderate to high humidity levels. They will tolerate full sun when grown under good conditions but often the best looking plants receive midday or afternoon shade in hot summer climates. It is also a good idea to select a site with good air circulation which will help to prevent the establishment of pests as well. Once established in the landscape they should require minimal care. For in-depth planting instructions see our “Planting a New Plant” growing guide and remember not to plant your new Gardenia too deep (see the planting diagrams near the bottom of this guide), the surface of the root ball should be even with or only slightly above the surrounding ground level once the soil has settled around it. Those surface roots need air too! In the northern portions of their range consider planting them in a protected site to help protect them from the coldest winter winds such as on the south or east side of a house, building, or other wind break.
These tropical to subtropical evergreen shrubs need on average the equivalent of 1” of rain per week once established in the landscape. Young plants may require slightly more during their initial establishment phase of the first 1-2 years depending on your specific growing conditions. When you do water, water deeply and thoroughly to teach the roots to go deep after water. They will become less dependent on you and the water hose to maintain them in the future and your water will be used more effectively and efficiently. Gardenias like to have an evenly moist soil but they should never stay soggy wet and they should have good to excellent drainage whether grown in the ground or in containers. In containers or in the ground allow the soil to become slightly dry to a depth of between ½ and 1” between waterings but generally not to the point of wilt.
.jpg)
Golden Pinwheel Gardenia
Pruning Your Gardenias
Occasionally it is necessary to prune your Gardenias if only to shape them slightly. It’s always best to choose the appropriately sized Gardenia for the space that you have initially. Any major pruning should be done immediately after flowering and before August for most areas that they are grown in. Severe pruning should be done in spring. Pruning after mid-August in our area (zone 8B) may allow tender new growth to get nipped back by early frosts or freezes. This makes for a rather unsightly shrub all winter and may cost you flower buds as well as being detrimental to the health of your plant as the open wounds may allow entry sites for various bacteria or other diseases to infect your plants. If you have just a few precocious ‘water sprouts’ that have out grown the rest of the plant during the growing season remove them about 4-6” below the remaining canopy and again preferably before August.
Black Leaves on Gardenias
Black sooty mold growing on top of the leaves is an indicator that sap sucking pests such as white flies, scale, mealy bugs, or aphids have made your Gardenias a home. If you do choose to treat your plants for these pests remember to apply sprayed pesticides underneath the foliage where these pests hide from predators while they make their living. Always read and follow the directions on the label when applying pesticides! When grown indoors and anywhere overhead watering or rain is missing these same pests may be an issue but under these conditions spider mites may be the main issue. Spider mites can generally be controlled by putting a potted planted in the shower and hosing the underside of the foliage down with a thorough spray of water repeated every few days for a couple of weeks. Horticultural oil sprays are a good choice and will help eliminate any of these pests if applied correctly. The advantage with oil sprays is that they physically suffocate the insects and they have no opportunity to build up a resistance but they must be reapplied every 5-7 days to help kill any insects that may have hatched out during that time period. This must be repeated about 3-4 times to help ensure you have eradicated them.
Yellow Leaves on Gardenias
Yellow leaves on Gardenias are not always a bad sign but they can be a telltale. Even though these shrubs are ‘evergreen’ lower, inner leaves on the plant sometimes outlive their usefulness, sometimes they become shaded out, sometimes they get old, and as with a Live Oak, Azaleas, and many other plants that we consider to be ‘evergreens’ the Gardenia will drop these leaves. This often happens in late winter or early spring and is just a normal part of the ‘leaf lifecycle’. If this is happening during late spring and summer on the lower leaves of the plant then it may be a sign that the plant is getting too dry between waterings or is otherwise root stressed. We often see this occurrence on containerized plants.
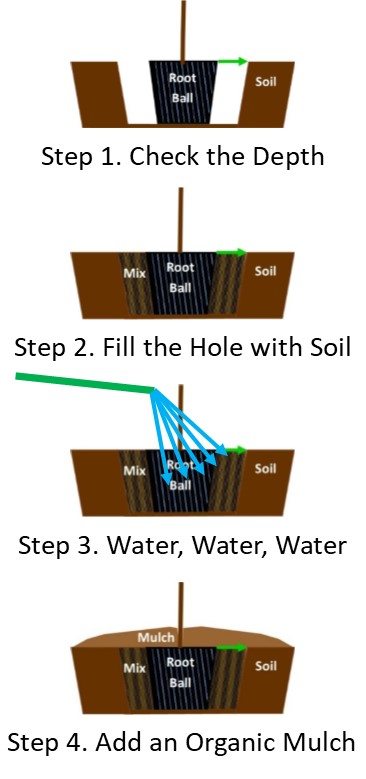
Planting Steps for Soils with Average or Better Drainage
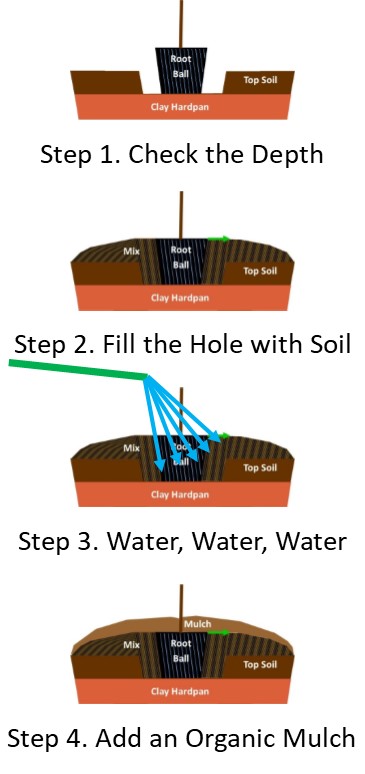
Planting Steps for Poorly Drained Soils or With Clay Hardpan
Yellow Green or Light Green Leaves on Gardenias
If the overall coloration of the plant is a yellow green and not the normal dark green then it may be due to a simple lack of nutrients. As long as you know that your soil pH is acidic, whether containerized or in the landscape, then simply fertilizing the plant may be enough to correct the situation. We generally use a balanced, acidifying slow release fertilizer, like Osmocote’s 14-14-14 formulation, between mid-March and early August. A soil test is always best and you can see your local county extension office about getting your soil properly tested if you are not sure. If your soil pH is above 6.0 you may have to add iron (you may want to consider chelated iron) as well as a soil acidifier to help get the proper color back into your Gardenias as they are unable to take up various nutrients in the proper amounts once the pH gets too high. This is often indicated by darker green veins and lighter green areas in between. Soil compaction is another issue that can cause your plants to look as though they are lacking in nutrients and they are lacking because the roots are unable to penetrate the surrounding soils and cannot access additional nutrients because the soil is simply too hard. An organic mulch will help with this over time but good soil preparation will be key in these planting sites. You may also see gray-green lichen growing on the branches of these plants as an indicator of poor health and growth. The lichen is simply a hitchhiker and is not hurting the plant in anyway.
Brown Leaf Tips, Brown Spots, or Edges on Gardenias
Brown leaf edges, brown leaf spots, and especially brown leathery leaves that remain on your Gardenias are generally a sign that your plants are under root stress due to staying too wet or from being planted too deeply. Container grown plants with saucers underneath them where the saucer is used as the ‘water gauge’ often exhibit these signs. Remember the only real purpose for a saucer is to keep water off of the floor and the furniture, it is not really a water reservoir for your plant to drink out of whenever it needs water. Gardenias are generally not meant to be grown in standing water and this is sure to be the death of even the strongest plants. When you water a container grown plant indoors, water from the top to allow the water to flow through the soil, pulling in fresh air behind it, as there is actual air exchange in the root zone. Any excess water will flow into the saucer. Allow the water to stand in the saucer for up to 30-45 minutes. If all of the water is absorbed by the soil then water it again and repeat until there is some water left over. After 30-45 minutes empty the saucer. Pay attention to how much you used and you will know about how much it needs each time.
A buildup of salts in the soil of containerized plants can also cause leaf edges to turn brown even though Gardenias are somewhat salt tolerant. It is a good idea to ‘flush’ the soil with ample amounts of water periodically (every few months if you are having this issue) to help leach out some of the built-up salts. Periodic repotting, not necessarily up potting, by replacing a significant portion of the old soil with new will also help to prevent this and should be done every few years as general maintenance on potted plants. Some of us may be likely to ask “Where do the salts come from?” and the answer is that fertilizers are chemically considered salts even though this is not the table salt that usually comes to mind. Speaking of salts, Epsom Salts can also help to provide Magnesium and Sulphur in forms that the plant can use and these are important micronutrients when growing containerized Gardenias.
If your containerized plant already has brown leaves or edges you may need to carefully remove the plant from the container and smell of the soil. If it smells sour then you will need to repot or replant it into new fresh soil after having washed as much of the old sour soil off of the roots as possible. Try not to break or disturb any remaining healthy white roots and cut away any rotten brown or black roots (they will be soft and or mushy). It may already be too late so don’t get your hopes up too high but you may just save and Gardenias are often tougher than they look. It will probably be a good idea to use some type of fungicidal/bactericidal drench as well once you have completed your task. You may want to follow that with a root stimulator in a day or so as well. Plants in the landscape may need to be lifted and replanted at the appropriate depth or they may continue to decline. Be sure that they have the appropriate drainage and soil type for proper growth, health, and vigor. If not consider moving them to a different location in the garden or landscape that does.
For our detailed "Planting a New Plant... Growing Guide" click here
References and Additional Resources for Growing Gardenias
Gardenias are Blooming Across Louisiana – Dan Gill, Kyle Huffstickler, and Allen Owings - LSU Agcenter
Gardenias – Kathleen Ruppert and Joan Bradshaw – Florida Cooperative Extension/University of Florida
Gardenia Diseases & Other Problems – Joey Williamson and J McLeod Scott - Clemson Coop. Extension
Landscape Shrubs – Gardenia – University of Arkansas Cooperative Extension Service
Gardenia: A Gardener’s Challenge – B. Rosie Lerner – Purdue Extension
For a printable or downloadable PDF version please (does not include the planting diagrams but these are clickable and can be printed seperately) click here.
If you have an additional questions or input please feel free to contact us.
Thank You & Good Growing,
Jeff McMillian
& The Crew at Almost Eden