Planting or Uppotting a New Plant(s) into a Larger Container
For planting new plants in the ground see our Planting a New Plant Growing Guide
All images in this guide are clickable if you would like to see the bigger picture
Container Size Selection is IMPORTANT!
Most plants need to be stepped up to the next container size instead of selecting a container that fits the ultimate size of the plant. For example, an average 3.5-4.5” (pot size, not plant size) plant should be uppotted into a 6” or 1-gallon sized pot initially (see the table below). Once it is fully established in that container with a strong root system, which may take only a few months or up to a year or more depending on: the vigor of the particular plant species or cultivar you are working with, the length of your growing season, and your growing conditions. If you take a 3.5-4.5” potted plant and plant it in a 12-18” sized pot what happens is that there is too much soil that is not being utilized by the root system and that soil ends up staying too wet for too long. Physiologically what happens is that the fine root hairs, which are responsible for absorbing water and nutrients from the soil, literally drown or suffocate and die. Suddenly the plant is no longer able to take up water or nutrients even though there is plenty of wet soil in the container. The plant begins to wilt because it is unable to absorb water and so we water it more trying to improve its condition even though this only makes the situation worse. Hands down, this is the number one way in which we see plants die when it comes to container gardening. Yes, you can take a Tomato plant, Coleus, or other very vigorous plant and successfully plant it into an 8-14” container often with no issues but these are the exception to the rule, not the rule itself.
Chart for Appropriately Stepping Up in Container Size

|
Note: Often, for moderately vigorous plants you can jump to the second larger size, but you must make sure that you don’t keep it too wet even then. For slower growing plants, plants that are sensitive to high moisture levels, and most cactus and succulents you may only want to step up in pot size such that there is 1” of space between the sides and bottom of the original root ball and the new container.
Mixed Container Gardens: For a mixed container garden you still do not want much more than about 2-3” between the individual root balls and the sides of the new container. We have been known to plant them with the root balls touching or nearly so for an instantly full container garden.
|
|
|
Potting Soil Selection – Not just any soil will do
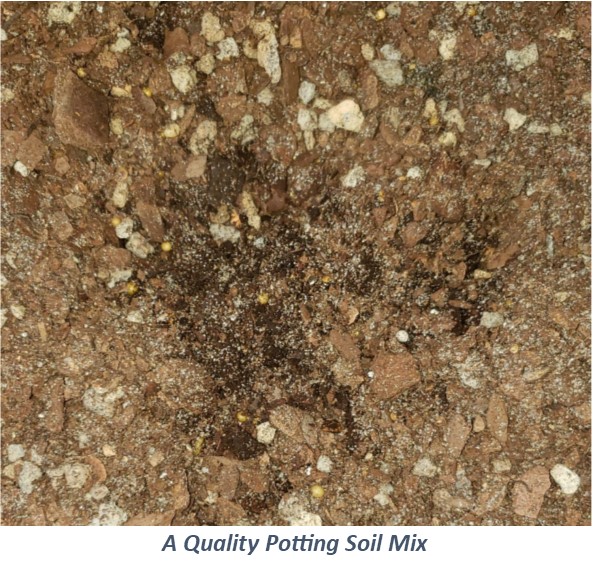
A Quality Potting Soil Mix
Use a good quality potting soil and your plants will reward you for it. As John has always said “Take care of the roots and the roots will take care of the top!”. You should not use a seed starter mix or average sandy loam, clay, or other topsoil for containers under normal circumstances. The seed starter mixes, topsoil, and clay do not have enough large particles to create the air spaces required in containers that are over about 3” deep. Air exchange is important in the root system and a good quality actual “potting soil” will have a lot larger variation in particle sizes creating the necessary air spaces for a strong and healthy root system.
We prefer to have a good mix of particles across all sizes that range from as large as about 1” (pieces of aged pine bark) down to the very fine humusy, silt-like particles and tiny peat moss sized particles. We have had excellent success with potting soils that are composed mainly of an aged pine bark, normally with a mix of bark pieces that range in size from up to about 1” wide and no more than about 1/8-1/4” thick in size down to fairly fine dust-like particles. The soil mix will also contain lesser amounts of other amendments like: peat moss, builder’s sand, coarse perlite, coarse vermiculite, small gravel, and/or hadite. This ensures that we have plenty of, but not too many, various sized air spaces that the roots can utilize for air exchange. For an in-depth guide to why roots need air for respiration see our Proper Mulching Techniques and Roots Require Respiration Growing Guide. A good quality potting soil should look similar to what you see pictured here.
Another advantage of having these larger bark pieces and mineral particles (like sand, perlite, hadite, small gravel) in the soil is that it actually extends the life of the soil because they take longer to break down into fine particles that eliminate air spaces. We can even skip a year or even two before having to uppot or repot the average plant under most circumstances without it being detrimental to the overall vigor of the plant.
Did you know that both pine bark and peat moss have natural anti-fungal properties that help to prevent root rot and damping off?
Steps for Potting a Container Grown Plant or Plants into a New Larger Container
Uppotting a Container Grown Plant
For very large containers and plants that are sensitive to moisture it can be a good idea to place large rocks, pieces of broken clay pots, and we have even seen packing peanuts placed in the bottom of the container over the weep holes to prevent them from getting clogged up by roots or natural soil settling. For the average plant in a 10” or smaller pot this step is normally not a requirement. For cactus, succulents, and other moisture sensitive plants we may do this even for 4”, 5” and larger containers to help ensure reliable sharp drainage.
Optimally the new plant's root ball will never know that it has been disturbed except for the new soil which surrounds it. Your goal here it to minimize stress and to prevent 'transplant shock'. A few things to keep in mind - always keep roots in the shade, be prepared to completely finish the process (I know this seems obvious), try not to leave an exposed root ball exposed to air for extended periods as this can cause the roots, and maybe more importantly the fine root hairs, to dry out excessively and they may die limiting your plant's ability to draw moisture and nutrients from the soil.
Steps for Uppotting Your New Plant into a Larger Container
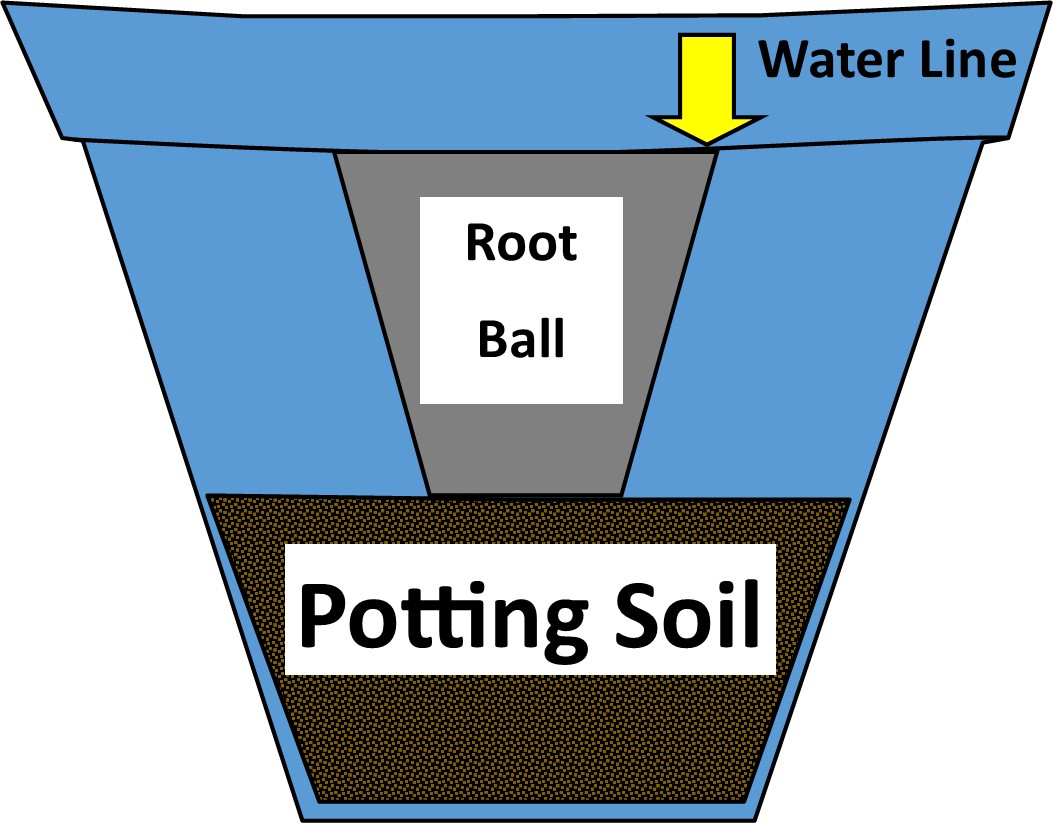
- 1. Fill the container with soil and firm it into place (do not pack it as this removes the all-important air spaces) to a depth such that the top of the root ball of the new plant that is being put in the container will end up even with the top of the ‘water line’ that most containers have. Depending on the container size, the water-line can be anywhere from ½” from the top for a 3.5-4.5” pot to as much as 2” from the top on a typical 12-14” container. It is usually evident as the pot will be slightly wider and then suddenly and noticeably get slightly narrower at that point. Some manufacturers use a change in the pot’s patterning to help further denote the ‘water line’. It is important to pay attention to where the water line is and to leave that volume of space at the top of the pot to help facilitate in watering the plant.
- 2. Set the plant, while it is still in its original container, on top of the soil to check that you have your depth correct. See the diagram Uppotting a Container Grown Plant.
- a. Mixed Container Gardens: If you are working on a mixed container garden with different pot sizes (depths), you will need to adjust the soil beneath the root ball of each plant so that the top of all of the root balls are even with the water line.
- 3. Once the potting soil depth is correct, now you can carefully remove the existing container. It is typically a good idea to do one of the following to help loosen the root ball from the plant’s container:
- a. For small containers ranging from 2.5” up to about a 5-6” or 1-gallon container you can often gently squeeze the container from both sides and again at a 90o angle to that and the pot should bend out away from the root ball. Now, while holding your hand(s) and fingers spread across the top of the pot to catch the weight of the soil and the plant, gently turn the plant and pot upside down and the root ball should easily slip out of the container. If it doesn’t slip out easily try loosening it a little more.
- b. Never yank a plant out of the pot by the stem. You can break the top of the plant off or you can destroy or shatter the root ball creating a bareroot plant which is harder to successfully transplant, can cause the transplant to go into shock and die, and is much less resistant to stress than a plant with an intact root ball.
- c. For some harder to get out plants and larger plants you can roll the sides of the pot on the corner of a table, across a shovel handle, or even across the edge of a concrete walk or other surface with the pot and plant upright but at about a 30-45o angle to a table or other corner shaped edge.
- d. Plants that are large, very difficult to get out of the pot, and/or have roots growing out of the pot may need to either have:
- i). a slit cut down the two sides of the container all the way from the top down to the weep holes where the roots emerge from.
- ii). if the roots have grown out of the pot you can either cut the pot off as mentioned above or you will have to prune the roots back so that they will easily pass through the weep holes (the holes the manufacture put in the bottom or sides of containers that water seeps or ‘weeps’ out of).
- iii). for clay pots and ceramic pots that are too stubborn to come off you may need to actually break the pot with a hammer or other hard object to get the container off. Be careful and wear safety glasses because small pieces can chip off easily during this process. Save the broken pieces of terra cotta for covering the weep holes on large containers as previously mentioned.
- 4. Gently set the root ball on top of the potting soil. For a single plant you generally want to center to root ball in the container.
-
- a. It is okay to center the top of the plant in the container even if that means the root ball is not in the center.
- b. For trees or tree-shaped plants you can slightly tilt the root ball (see the Straightening a Crooked Tree in a Container diagram at right), from about 15 to as much as 30 degrees if you need to get the trunk straight. Keep the center of the top root ball even with the top of the surrounding soil and shape the soil beneath the plant to match the angle of the bottom of the root ball. A portion of the root ball will be sticking out of the soil and it should still be just fine.
- c. For multiple plants in the same container when creating specimen plants and for mixed container gardens try to give each root ball about equal space.
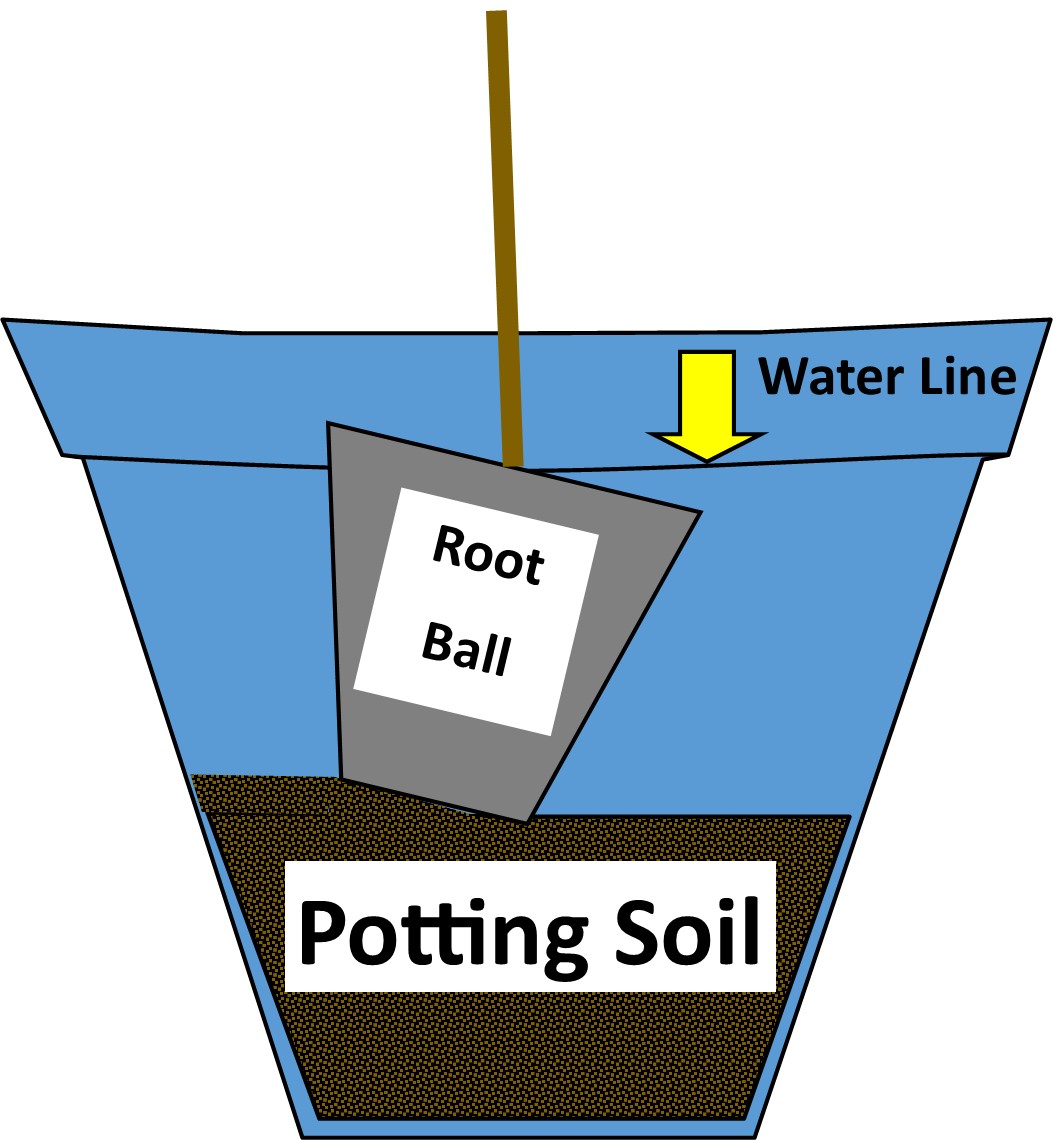
Straightening a Crooked Tree in a Container
- 5. Now you can add additional potting soil to fill the void around the root ball(s) such that it is even with or is only slightly above the top of the existing root ball. You do not even have to firm it into place unless you have a plant that is very top heavy, as the next step will take care of that for you.
- 6. Water, water, water - literally. Use a water breaker on the end of your watring hose so that the water falls more like rain and doesn't erode pockets into your potting soil. Water the plant until the water level is even with the top of the new container and allow it to drain through the soil.
- a. Thorough and proper initial watering will help to remove large air pockets in the soil and some times you even can see air bubbling up out of the soil. This also gives the root ball good contact with the surrounding soil.
- b. Once the soil settles, check the depth of the potting soil, it should be even with the top of the soil on the existing root ball. If not, add a little more potting soil and water thoroughly again.
- c. Check your soil level again and if you need to add a little more soil.
- d. Now water thoroughly, one final time.
We cannot stress how important it is for the surface roots of the existing root ball to be exposed to air, again for air exchange. If you cover these roots you can again suffocate a new plant. It is better for the root ball to be sticking up an 1/8” high than to be buried that deep below the new potting soil. We have seen perfectly happy plants with their root balls sticking ½” or more out of the soil! Again, that is the exception and not the general rule. If you cover these surface roots on Azaleas, Camellias, Sweet Olives, Magnolias, and other sensitive species they can quickly go into decline and may ultimately die.
If you intend to move the plant, allow the soil to sit there and settle for 45-60 minutes first so that it can sort of lock into place (I suspect that ionic and covalent bonds may be involved to some extent). -OR- before moving it, wait to do the watering step until you get your plant set in its final resting place. If you move a newly potted and freshly watered plant whose soil has not had a chance to ‘lock’ into place on a cart or wagon (they jiggle a little even on smooth surfaces) the soil can turn into the consistency of quick sand thus eliminating the air spaces you have worked so hard to conserve.
Properly Watering Container Grown Plants

Natural water and air flow in potting soil in containers
In nature, water normally comes in the form of rain from the sky. As this water penetrates and gravity pulls it down into the soil it creates a vacuum behind it which draws in fresh air for the root system into the soil replacing the old air. When you water from the top you are not only providing moisture but fresh air for the roots to work with. Be sure to use a water-breaker which creates a soft rain-like effect on the end of your garden hose so that you are not eroding soil away from the roots.
So how to do you know when to water again? The easiest way is to stick your finger in the soil to about your first knuckle (about a 1/2" deep in pots smaller than about 6" and up to 1" deep in larger containers). If the soil at that depth feels moist and cool (below air temperature) then you can probably wait to water. If the soil feels dryish and it is about even with the air temperature then it is probably time to water.
When it is time to water, water deeply and thoroughly to fully resaturate the entire volume of soil. Light frequent shallow waterings are much more likely to promote fungal and bacterial infections. Imagine if you keep your feet wet day after day inside your shoes before long your true friends will tell you have to change your socks! Shallow watering teaches the roots that they have to go to the soil's surface to get water and this is the first part of the soil to dry out. In the ground and in containers water deeply, thoroughly, and infrequently for healthier plants.
Plants that are very root bound and that are growing vigorously can dry out very quickly and may need to be watered as much as twice a day to keep them happy, healthy, and growing until the next time it is repotted. Very dry soil will often shrink to some extent away from the sides of the container. When you begin to water it, much of this water will drain between the sides of the container and the soil mass escaping before much of it is absorbed. In this case, you may need to use a saucer beneath the container to get the soil mass fully resaturated. Water from the top until the saucer (or other water reservoir) beneath it is full. Wait about 30-45 minutes and if all of the water has been absorbed from the saucer water it again. Repeat this process until there is still a significant amount of water left in the saucer after the 30-45 minutes then dump this water out.
Saucers are a great way to keep water off of the floor, counter, deck, patio, desk, etc... Saucers are NOT meant to be used as water-reservoirs that are kept constantly full. There is no quicker way to drown the all important root hairs that absorb water and nutrients. Always dump out excess water from the saucer once the volume of soil has become saturated. Yes, there are plants that will grow under these conditions like Pothos Ivy but the greatest majority of plants will not long survive under these conditions. At first they begin to wilt, no matter how much you water, this is becuase the root hairs have drowned and died and the plant can no longer absorb water even from the supersaturated soil mass. Even the old reliable Pothos Ivy will be happier and more vigorous in a healthy soil environment. More indoor plants die from staying too wet than from drought by a huge margin. I repeat, ALWAYS empty the saucer of water once the soil is fully resaturated.
"Self-Watering" pots have been used for years to grow African Violets and some other gesneriads. A cotton string is placed between the side of the pot and the soil and trails out of a weep hole into a water reservoir that is below the bottom of the weep holes of the pot. As the soil dries out water is wicked up out of the water reservoir via capillary action into the soil replacing the lost water. Self-watering pots have become more and more widely available. If you are going to use one be sure that the water reservoir does not stay in contact with the bottom of the soil continuously or it may have the same effect as keeping water in the saucer all of the time. Just keep this in mind and in my personal opinion standard pots are a safer bet.
Brown or Yellow Plant Leaves Can Indicate Too Much or Too Little Water - "Moisture Stress"
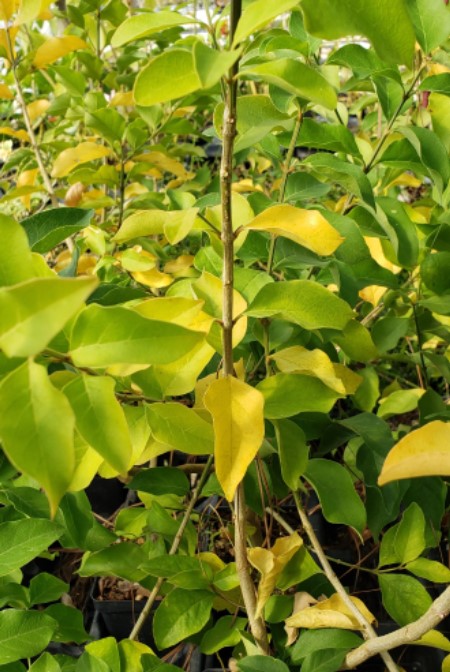
Soil is getting too dry between waterings. Lower and inner leaves turn yellow and fall off of the plant.
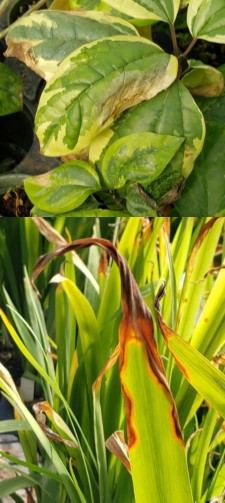
Soil is staying too wet. Leaf tips and or edges turn brown or entire leaves turn brown, remain on the plant, and the brown portions are often feel leathery and generally do not crumble easily.
Your plant's foliage can give you hints about water stress - whether too wet or too dry. If lower leaves are beginning to turn yellow and fall off and/or they turn crispy brown and feel dry and are easily crumbled between your fingers then the plant may be getting too dry between waterings. You may need to either increase your watering frequency and intensity and/or it may be time to uppot the plant.
Foliage with brown edges or tips are an early indicator that the plant is staying too wet, although excessive soil salts can imitate this and we'll discuss this more below in the Repotting Section. Foliage that turns brown, feels leathery, and doesn't readily fall of of the plant is an indicator that the plant is in severe stress. The root hairs have suffocated or literally drowned and are dead. The plant may even wilt every day no matter how much you water. At this point it is time to inspect the soil. For a small plant you can carefully dump it out of the pot and if the soil has any type of sour smell the plant will have to be repotted with fresh new soil in order to save it.
Algae growth, not moss which is discussed in the next paragraph, on top of the soil will turn the top of the soil green. Under very wet conditions it can develop into a slick, maybe even greasy feeling mass (not velvety feeling like moss) that is generally deep green to blue-green in color. This is normally another indicator that the soil is staying too wet for too long. The potting soil's surface should basically stay the same color throughout its lifespan, although it may lighten or gray a little.
Green Soil - Too Wet or Moss?
Moss growing on the soil is an indicator that your soil is beginning to age and break down into finer and finer particles. It generally takes more than a year to begin to get established but can be a decorative ground cover and some gardeners seed it or transplant it into the container intentionally. Moss generally is not harmful to the other plant(s) in the container except that it does use a small amount of moisture.
When and How to Repot a Plant
Potting soils have a lifespan. Over time the organic matter will break down into finer and finer particles through natural decay processes including the action of healthy soil microbes and fungi. As the particles get smaller and smaller so do the air spaces and so at some point repotting will be required. Potting soil generally lasts 1 to 2 years depending on the soil quality, its major components, and the plant.
To "Repot" a plant is to replace the old soil with new fresh quality potting soil. Uppotting may not be required depending your plant's needs and your space and is sometimes limited by how strong your back is. Bonsai, for example, are generally 'repotted' and may be root pruned periodically to keep them healthy, not necessarily uppotted.
- 1. Carefully remove the plant from its container using one of the methods above under Step 3. of the "Uppotting a Container Grown Plant" header.
- 2. Keep the root ball in the shade while you are working if at all possible.
- 3. Now begin to work the old soil out from between the root ball. You can use your fingers to tease out the old soil without breaking and bruising the roots. One method that I use is to take the water breaker off of the end of the hose and use the cut-off valve behind it to create a strong (but not blistering) stream of water to wash the finely broken down soil out from between the roots. You will want to remove as much of the old soil as is reasonably possible without unneccessarily damaging the roots of the plant.
- 4. Root pruning can be beneficial for some plants as in the art of Bonsai. Normally you will reduce the top growth of the plant a proportional amount if you do decide to root prune. It is not generally a requirement.
- 5. Prepare your pot by placing a small amount of soil in the bottom of the pot. Usually about 1/4-1" deep. It will be proportionally less in smaller containers and more in larger containers.
- 6. Locate the top of the plant's original soil depth. You can usually see a change in color on the plant's stem or use the upper most roots as a guide.
- 7. Place the plant back into its container to check that the plant is at the correct depth in the container. The top of the original soil line should be even with the pot's "water-line" (see the diagram near the top of this guide labeled "Uppotting a Container Grown Plant"). The soil in the bottom of the container also built up, if necessary, to match the bottom of the lowest roots. I have been known to create a crown of soil to help match the root ball if needed.
- 8. The most difficult part of this process will be to work the new soil back in and around the roots to get them back in contact with the potting soil. You can gently firm the soil in and around the roots as much as is reasonably possible. Don't fret over it too much because when you water this will help the soil to settle into position.
- 9. The most important part of this process will be the initial watering. Water the plant thoroughly until you have filled the pot all the way to the top. If you feel you need to you can leave the water breaker off of the hose and use the stream of water to help shift the soil in and around the root ball. Allow the water to drain from the container and check the soil level and add more soil as necessary. Water it again and allow it to drain through. Adjust the soil if needed and water again and allow that to drain through. Water, allow it to drain, and adjust the soil level. The final watering should not require much if any additional soil and so then you know you are done.
- 10. As previously mentioned but in case you missed it, if you intend to move the plant, allow the soil to sit there and settle for 45-60 minutes first so that it can sort of lock into place (I suspect that ionic and covalent bonds may be involved to some extent). -OR- before moving it, wait to do the watering step until you get your plant set in its final resting place. If you move a newly potted and freshly watered plant whose soil has not had a chance to ‘lock’ into place on a cart or wagon (they jiggle a little even on smooth surfaces) the soil can turn into the consistency of quick sand thus eliminating the air spaces you have worked so hard to conserve.
We hope this helps to get you growing. If you have more questions or are in need of further assistance, please feel free to contact us.
Thank You & Good Growing,
Jeff McMillian
& the Crew at Almost Eden


-1.JPG)
.JPG)