Guide to Properly Planting a New Container Grown Plant in the Garden or Landscape
For potting, repotting, and uppotting a plant in containers see our growing guide specific to that by clicking here. This in-depth guide also includes proper watering techniques for container plants and what your foliage and soil color can tell you about your plant.
I. Site selection is key! – like LSU Agcenter says “Right Plant, Right Place” – for more info about growing conditions see your new plant’s individual product page on our website. You can also look for the additional growing guides from Almost Eden near the bottom of an individual plant's individual product page. The County Extension services offer a ton of excellent detailed growing information as well. Learn more about this at https://articles.extension.org/ and do a search to find more info about any given species.
Partial or Morning Sunlight
A. Sunlight
- Hours per day
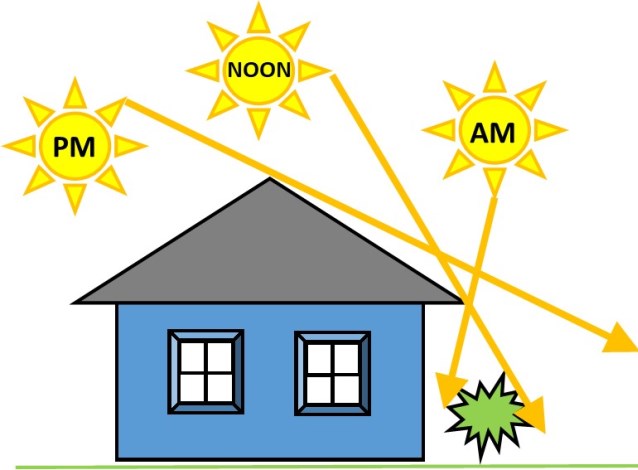
- Intensity - time of day it receives sunlight
a) Many more shade loving plants tolerate morning sunlight (a.k.a. AM sunlight) or cool sunlight than midday and afternoon sun especially in hot summer climates
B. Soil
- Soil tests are cheap compared to the time and effort lost, possible plant loss and disappointment, as well as the fertilizer and money wasted due to guesswork. Contact your local county extension agent to get assistance and guidance if you need help getting your soil tested.
- Structure (drainage, compaction, etc…). Compacted soils may need to be loosened or aerated to aid in root penetration.
- pH
- Organic matter content (moisture & nutrient holding ability)
- Fertility & other minerals
C. Mature Size of the Plant - provide enough space for it to reach maturity so that it is not crowded out and so that it will not crowd out other desirable plants. A plant should have enough space to reach its full potential
D. Climates & Microclimates
- Temperature - Cold hardiness, heat tolerance, chill hour requirements. You can gain nearly half a zone by planting in a protected east or south facing side of a building or other structure along with providing a proper winter mulch.
- Click here to find your USDA cold hardiness zone
- Good air circulation can be important for plants that prefer dry over wet like Agastache, Lavender, Rosemary, some Salvias, and similar plants. Gardenias and plants that are susceptible to insect pressure, aphids for example, will have less insect and disease problems if natural predators can easily access the foliage from all sides.
- Moisture
II. Planting Steps for Average to Well-Drained Soils
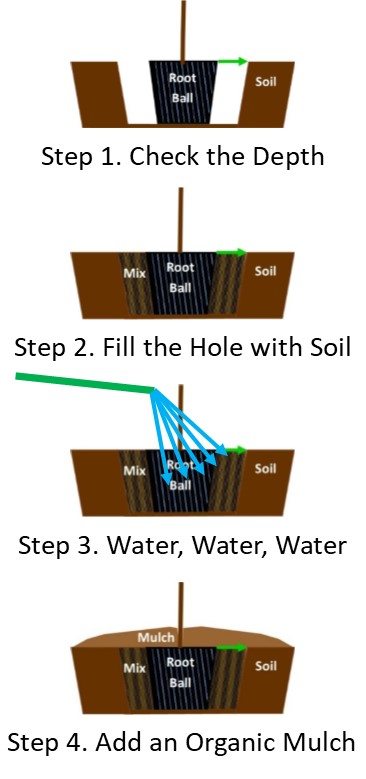
Planting Steps for Soils with Average or Better Drainage
A. Dig a hole about twice as wide as the container but no deeper than the plant's existing root ball.
- Stop digging if you hit a poorly draining clay hardpan or have poorly drained soils and plants that are sensitive to it and go to Step IV.
- Use your shovel or spade to break up any clumps into a loose friable soil that it is easy to stick your fingers into and thus it should be easy for roots to grow into.
B. Check your depth
- Your goal is for the top of the existing root ball to end up even with the top of the surrounding ground level. (For an in-depth guide to why surface roots need air for respiration see our Proper Mulching Techniques and Roots Require Respiration Growing Guide).
- Flatten and firm the bottom of the hole to match the bottom of the root ball.
- Set the plant, while it is still in its container, into the hole and check the depth. Add or remove soil as needed. See planting diagram at right.
C. Add and mix in any amendments as needed to the excavated soil
- For Camellias, Azaleas, Magnolias, Hydrangeas, and other plants that prefer a humus rich soil it is often a good idea to mix a good quality potting soil or peat moss into the soil to help them get established.
- You can also work in a slow release, non-burning fertilizer at this time if desired.
D. Carefully remove the root ball from the container
- Your goal here is to not disturb nor shatter the root ball during this process, if possible, nor pull on the stem of the plant.
- With small plants you can often simply gently squeeze the sides of the container and then turn the plant upside down while letting gravity ease the root ball out of the container. You must be prepared to catch the full weight of the plant and root ball with your open fingers. For larger plants it is often easier to lay them on their side, and even then it is best not to pull on or squeeze the stems.
- Place the root ball in the center of the hole and check your soil depth again to make sure that the level is correct. Adjust as necessary. For larger plants and trees you may want to step back to make sure that the plant is straight. You can adjust the soil beneath the plant if necessary just remember that the bottom of the root ball should have good contact with the bottom of the hole across its entirety.
- Even if you set the plant perfectly in the hole the first time, it is still a good idea to carefully turn the plant 1/8 to ¼ of a turn clockwise then back to ensure there is good contact between the bottom of the root ball and the soil.
E. Backfill the hole with the excavated soil or amended soil
- Fill the space around the root ball with the loose soil, lightly firming it in place with open fingers as you go.
- Your goal here is to remove the largest air spaces while retaining a friable soil. There is no need to “pack the soil” if you water your plants in properly.
- Fill the hole with firmed soil until it is even with or just slightly above the level of the surface of the new plant’s root ball.
- Place any “extra” soil into an empty container for later use.
F. Watering – 3 times (John always says to "water, water, water!"). This may be the most important step in the entire process, seriously.
- Thorough watering ensures that the root ball has good contact with the surrounding soil (i.e. it never knows it’s been transplanted) and it removes any large air pockets that we may have missed during planting.
- Water thoroughly and well past the point of runoff using a water breaker attached to a water hose or watering can. Don’t wash the soil away from the root ball during this process or you will have to replace it. Once the water begins to run off allow that to soak in. You should see bubbles coming up from around the root ball during this process if you are doing it properly.
- Allow the water to thoroughly soak in and check your soil level and add more if necessary.
- Water thoroughly again. Allow it to soak in. Check the soil level and adjust if needed.
- Water thoroughly one last time. Check the soil level and adjust if needed.
- If you adjusted the soil in step 5 water again.
G. Mulch - click here to learn more about the advantages of using a proper organic mulch below.
III. Actual Planting in Poorly Drained Soils or Soils with a Shallow Clay Hardpan
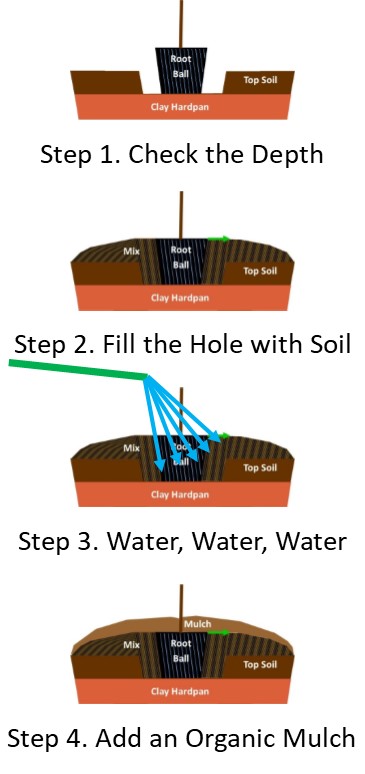
Planting Steps for Poorly Drained Soils or With Clay Hardpan
A. Dig a hole twice as wide as the container but no deeper than the root ball.
- Stop digging if you hit a poorly draining clay and plan to build a mound of soil (sometimes referred to as a "pimple mound") up to the edges of the root ball. Digging into a heavy clay soil may create a bowl-shaped low area under the plant where water can stand which may lead to root rot and other disease problems.
- Use your shovel or spade to break up any clumps into a loose friable soil that it is easy to stick your fingers into thus it should be easy for roots to grow into.
B.Check your depth
- Your goal is for the top of the existing root ball to end up at least 2-4-6” above the top of the surrounding natural ground level. For small plants you can simply build a mound to start with and plant right on top of the soil.
- Flatten and firm the bottom of the hole to match the bottom of the root ball.
- Set the plant, pot and all, into the hole and check depth. Add or remove soil as needed. See diagram at right.
C. Add amendments as needed to the excavated soil
- For Camellias, Azaleas, Hydrangeas, and other plants that prefer a humus rich soil it is often a good idea to mix a good quality potting soil or peat moss into the soil to help them get established. Some plants will not tolerate standing water for extended periods of time and where these conditions occur should be planted in raised beds or containers.
- You can also work in a slow release, non-burning fertilizer at this time if desired.
D. Carefully remove the root ball from the container
- Your goal here is to not disturb nor shatter the root ball during this process if possible.
- With small plants you can often simply gently squeeze the sides of the container and then turn the plant upside down while easing the root ball out of the container. You must be prepared to catch the full weight of the plant and root ball.
- Place the root ball in the center of the hole and check your soil depth again to make sure that your level is correct. Adjust as necessary. For larger plants and trees you may want to step back to make sure that the plant is straight. You can adjust the soil beneath the plant if necessary just remember that the bottom of the root ball should have good contact with the bottom of the hole across its entirety.
E. Backfill the hole with the excavated soil or amended soil
- Fill the space around the root ball with the loose soil, lightly firming it in place with open fingers as you go.
- Your goal here is to remove the largest air spaces while retaining a friable soil. There is no need to “pack the soil” if you water your plants in properly.
- Fill the hole with firmed soil and mound it up until it is even with or just slightly above the level of the surface of the new plant’s root ball. It should look similar to the diagram above.
F. Watering – 3 times (John always says to "water, water, water!"). This may be the most important step in the entire process, seriously.
- Thorough watering ensures that the root ball has good contact with the surrounding soil (i.e. it never knows it’s been transplanted) and it removes any large air pockets that we may have missed during planting.
- Water thoroughly and well past the point of runoff using a water breaker attached to a water hose or watering can. Take your time so that you don’t wash the soil away from the root ball during this process or you will have to replace it. Once the water begins to run off allow that to soak in. You should see bubbles coming up from around the root ball during this process if you are doing it properly.
- Allow the water to thoroughly soak in and check your soil level and add more if necessary.
- Water thoroughly again. Allow it to soak in. Check the soil level and adjust if needed.
- Water thoroughly one last time. Check the soil level and adjust if needed.
- If you adjusted the soil in step 5 water again.
IV. Mulching
A. Apply an organic mulch at the appropriate depth (2-4” depending on the plant and mulch you choose).It should be shallower around small tender plants and moisture sensitive plants and deeper around large trees and shrubs.
1. Organic mulches provide many benefits including but not limited to:
- Moisture retention & evaporation reduction
- Weed prevention
- Less chance of mower & weed whacker damage
- Lower maintenance
- Weeds that do come up are often easier to pull
- Looks nice or aesthetically pleasing
- Recycles fall leaves
- Acts as an insulator – keeping the soil warmer in winter, cooler in summer, plus less there is a smaller daily soil temperature fluctuation
- Reduces soil erosion, compaction, and aids in water penetration
- Organic mulches like pine straw (preferred if available) or pine bark, are broken down into useful nutrients that are released back into the by soil macro & microorganisms
- The actions of these organisms (imagine a minute earthworm crawling through the soil creating tiny passages) alter the structure of the soil into an easily penetrable, root friendly soil that is readily colonized by beneficial mycorrhizae and a variety of other beneficial organisms. (i.e. a juicy, root smacking soil ecosystem designed for healthy and vigorous root and top growth as well as flower and fruit production)
Additional Excellent Online References for Planting Plants in the Garden and Landscape
Planting Process - the University of Maryland Extension Service
https://extension.umd.edu/hgic/topics/planting-process
Planting Guidelines - Container Trees and Shrubs - University of Arizona Extension
https://extension.arizona.edu/sites/extension.arizona.edu/files/pubs/az1022.pdf
Proper Planting Tips - University of Georgia Extension - Center for Urban Agriculture
https://ugaurbanag.com/proper-planting-tips/
Proper Tree Planting - see page 13 of A Guide to Louisiana Friendly Landscaping by LSU Agcenter
https://www.lsuagcenter.com/nr/rdonlyres/f8ab47f4-acb4-4533-8fe8-5b3f91754996/40293/pub2993layardshighres.pdf
Shrubs for Louisiana Landscapes - see page 4 - from LSU Agcenter
https://www.lsuagcenter.com/NR/rdonlyres/6AFDFD6C-894A-482C-B0A7-80320C42A4CF/38053/pub1638shrubsHIGHRES1.pdf
If you have any additional questions or input please feel free to contact us.
Thank You & Good Growing,
Jeff McMillian
& the Crew at Almost Eden


-1.JPG)
.JPG)